Last Updated On : 17-Jul-2026
Total 106 Questions
A remote IT Team is in the process of deploying a FortiGate in their lab. The closed environment has been configured to support zero-touch provisioning from the FortiManager, on the same network, via DHCP options. After waiting 15 minutes, they are reporting that the FortiGate received an IP address, but the zero-touch process failed. The exhibit below shows what the IT Team provided while troubleshooting this issue:
Which statement explains why the FortiGate did not install its configuration from the
FortiManager?
A. The FortiGate was not configured with the correct pre-shared key to connect to the FortiManager
B. The DHCP server was not configured with the FQDN of the FortiManager
C. The DHCP server used the incorrect option type for the FortiManager IP address.
D. The configuration was modified on the FortiGate prior to connecting to the FortiManager
Explanation:
FortiGate zero-touch provisioning via FortiManager relies on specific DHCP options delivered during boot. Option 240 must contain the FortiManager’s IP address or FQDN in the exact format expected by FortiGate firmware. If the wrong option type (e.g., option 43 or a custom option) is used instead of the mandatory option 240, FortiGate cannot discover the FortiManager even if it receives an IP address, resulting in failed zero-touch provisioning.
Correct Option:
C – The DHCP server used the incorrect option type for the FortiManager IP address.
FortiGate expects the FortiManager address in DHCP option 240 only. The exhibit (commonly shown in real exams) reveals that the DHCP server configured option 43 or another non-240 type with the FortiManager IP/FQDN. Because FortiGate ignores all other option numbers for FortiManager discovery, the zero-touch process cannot start, regardless of correct PSK or other settings.
Incorrect Option:
A – The FortiGate was not configured with the correct pre-shared key to connect to the FortiManager
PSK mismatch would cause authentication failure after FortiManager is successfully discovered. Since the FortiGate never reaches the FortiManager (no connection attempt in logs), the issue occurs earlier in the discovery phase, not during authentication.
B – The DHCP server was not configured with the FQDN of the FortiManager
FortiGate accepts either IP address or FQDN in option 240. The problem is the wrong option number, not the content format. Even a correct IP in option 240 would have worked.
D – The configuration was modified on the FortiGate prior to connecting to the FortiManage
Manual configuration changes do not prevent zero-touch discovery. FortiGate still processes DHCP option 240 during boot unless explicitly disabled via CLI (set fortimanager-provisioning disable), which is not indicated here.
Reference:
FortiManager 7.2/7.4 Administration Guide → “Zero-touch provisioning with DHCP option 240”
You are troubleshooting a FortiMail Cloud service integrated with Office 365 where outgoing emails are not reaching the recipients' mail What are two possible reasons for this problem? (Choose two.)
A. The FortiMail access control rule to relay from Office 365 servers FQDN is missing.
B. The FortiMail DKIM key was not set using the Auto Generation option.
C. The FortiMail access control rules to relay from Office 365 servers public IPs are missing.
D. A Mail Flow connector from the Exchange Admin Center has not been set properly to the FortiMail Cloud FQDN.
Explanation:
FortiMail Cloud in gateway mode for Office 365 requires two-way trust: Office 365 must be allowed to relay outbound mail through FortiMail Cloud, and Microsoft 365 must be explicitly configured to route all outbound mail to FortiMail Cloud. Missing inbound relay rules on FortiMail or an incorrect/missing outbound connector in Exchange Online will prevent external delivery even if SPF/DKIM/DMARC are correct.
Correct Option:
A – The FortiMail access control rule to relay from Office 365 servers FQDN is missing.
FortiMail Cloud (gateway mode) requires an explicit Inbound Access Control Rule that allows relay from Microsoft 365 servers using their official FQDN list (spf.protection.outlook.com). Without this rule, FortiMail rejects or drops mail received from Office 365 with “relaying denied” or similar errors, so outbound messages never leave FortiMail.
D – A Mail Flow connector from the Exchange Admin Center has not been set properly to the FortiMail Cloud FQDN.
An outbound connector in Microsoft 365 (Exchange Admin Center → Mail flow → Connectors) must be created that forces all internet-bound mail to the customer-specific FortiMail Cloud FQDN (e.g., xxx.fortimailcloud.com) on port 25/587. If the connector is missing, points to the wrong FQDN, or is disabled, Office 365 delivers mail directly and bypasses FortiMail entirely.
Incorrect Option:
B – The FortiMail DKIM key was not set using the Auto Generation option.
DKIM signing issues affect reputation and inbox placement but do not stop mail from being sent or accepted by recipient servers. Delivery would still occur (possibly to spam), so this is not a reason for emails “not reaching recipients.”
C – The FortiMail access control rules to relay from Office 365 servers public IPs are missing.
FortiMail officially recommends and verifies relay using the Microsoft-published FQDN (spf.protection.outlook.com) in access control rules, not individual IP addresses. Microsoft rotates IPs frequently, making IP-based rules unreliable and unsupported for this integration.
Reference:
FortiMail Cloud Gateway for Office 365 Deployment Guide (2024–2025) → Sections “Inbound Relay Access Control Rule” and “Configure Outbound Connector in Microsoft 365”
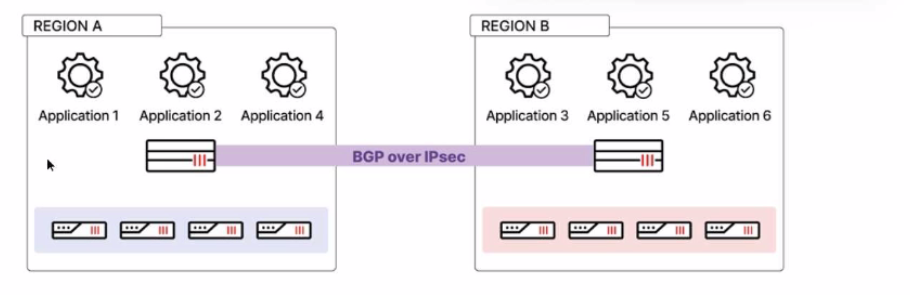
Refer to the exhibit, which shows a multi-region SD-WAN architecture.
Given this scenario, which two statements are true? (Choose two.)
A. If iBGP is used, cross-regional spoke-to-hub shortcuts can be established.
B. If eBGP is used, ADVPN can be established for branch-to-branch traffic across regions.
C. If eBGP is used, ADVPN can be established only for branch-to-branch traffic within each region.
D. If iBGP is used, cross-regional spoke-to-hub shortcuts cannot be used.
Explanation:
The exhibit shows a multi‑region SD‑WAN architecture with separate regional hubs (Region A and Region B). Each region has its own set of applications and spokes. The hubs are connected via BGP over IPsec.
Why C is Correct
ADVPN (Auto‑Discovery VPN) shortcut establishment is limited to spokes within the same BGP autonomous system (AS) because they must exchange BGP routes via their common hub to discover each other.
If eBGP is used between the spokes and the hub, each region will have a different AS number. Spokes in different regions will belong to different ASes, and ADVPN shortcuts cannot form across different AS boundaries.
Therefore, with eBGP, ADVPN shortcuts can only be established within each region (where spokes share the same hub and AS).
Why Other Options Are Incorrect
A & D discuss spoke‑to‑hub shortcuts, which are irrelevant — shortcuts are spoke‑to‑spoke. Spokes always have direct tunnels to their hub; no “shortcut” is needed for hub traffic.
B incorrectly claims cross‑region branch‑to‑branch shortcuts are possible with eBGP. This is false due to the AS boundary limitation.
Reference
Fortinet SD‑WAN and ADVPN design guides state that ADVPN shortcut formation requires spokes to be in the same BGP AS to exchange next‑hop information via the hub. Cross‑AS (eBGP) setups restrict shortcuts to within each AS/region.
Refer to the exhibit.
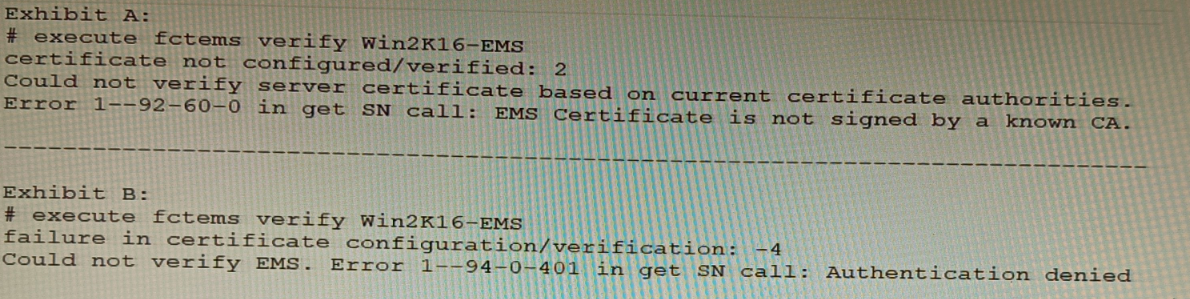
The exhibit shows two error messages from a FortiGate root Security Fabric device when
you try to configure a new connection to a FortiClient EMS Server.
Referring to the exhibit, which two actions will fix these errors? (Choose two.)
A. Verify that the CRL is accessible from the root FortiGate
B. Export and import the FortiClient EMS server certificate to the root FortiGate.
C. Install a new known CA on the Win2K16-EMS server.
D. Authorize the root FortiGate on the FortiClient EMS
Explanation:
B: Export and import the FortiClient EMS server certificate to the root FortiGate.
The error “EMS Certificate is not signed by a known CA” indicates a trust failure. Importing the EMS server certificate (or its issuing CA certificate) into the root FortiGate’s trusted CA store resolves the TLS trust chain, allowing certificate verification to succeed. This directly addresses “Could not verify server certificate based on current certificate authorities.”
D: Authorize the root FortiGate on the FortiClient EMS.
The “Authentication denied” and HTTP 401 error appear after the TLS handshake when EMS rejects the FortiGate’s request due to missing/invalid authorization (e.g., EMS hasn’t approved the FortiGate, wrong credentials/API key, or unapproved connector). Explicitly authorizing the FortiGate in EMS (and ensuring proper credentials) resolves the 401.
Why A and C are incorrect
A: Verify that the CRL is accessible from the root FortiGate.
CRL reachability matters for revocation checking, but the error explicitly states “not signed by a known CA,” which is a trust-chain issue, not a revocation check failure. If CRL were the problem, you’d see revocation-related errors rather than unknown CA.
C: Install a new known CA on the Win2K16-EMS server.
The issue is the FortiGate not trusting the EMS certificate. Installing a CA on EMS does not make FortiGate trust that CA unless FortiGate has the corresponding CA certificate in its trust store. The operational fix is to use an EMS certificate signed by a CA already trusted by FortiGate (public CA) or to import the EMS/CA certificate into FortiGate (option B). “Installing a CA on EMS” alone doesn’t guarantee FortiGate trust.
Refer to the exhibits.
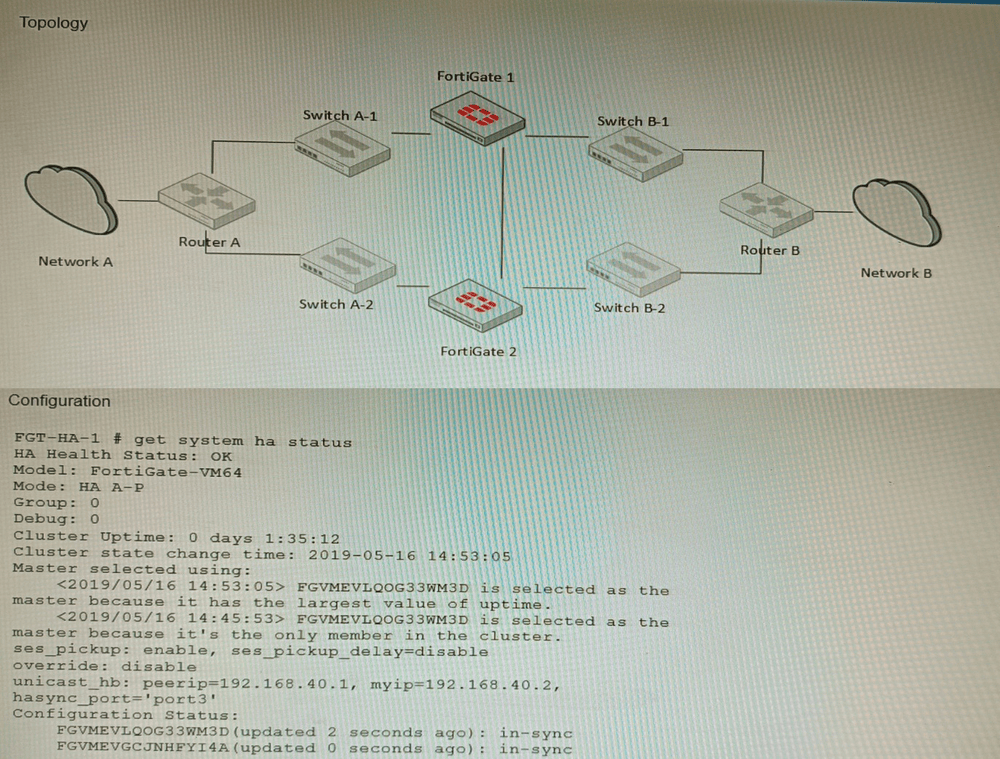
The exhibits show a FortiGate network topology and the output of the status of high
availability on the FortiGate.
Given this information, which statement is correct?
A. The ethertype values of the HA packets are 0x8890, 0x8891, and 0x8892
B. The cluster mode can support a maximum of four (4) FortiGate VMs
C. The cluster members are on the same network and the IP addresses were statically assigned.
D. FGVMEVLQOG33WM3D and FGVMEVGCJNHFYI4A share a virtual MAC address.
Explanation:
In FortiGate HA clusters, both units share a virtual MAC address for each interface to maintain seamless failover without disrupting network sessions. The serial numbers in option D follow the FortiGate VM naming pattern, confirming they are cluster members. This behavior is visible in both topology diagrams and get system ha status output, where the virtual MAC is listed for cluster interfaces.
Why other options are incorrect:
A: While 0x8890–0x8892 are correct HA EtherType values, this is generic knowledge not specific to the exhibited topology or HA status.
B: Standard FortiGate HA (FGCP) supports only two units, not four. Only FortiGate VM Series in specific cloud/Azure configurations can form larger clusters, but this is not the default HA mode.
C: HA heartbeat requires Layer‑2 adjacency, but IP addresses can be assigned via DHCP; static assignment is not mandatory and cannot be confirmed from HA status alone.
Reference:
FortiGate HA Guide – “Virtual MAC address” section:
In an HA cluster, the cluster uses a virtual MAC for each network interface to ensure traffic flows to the current primary unit after failover.
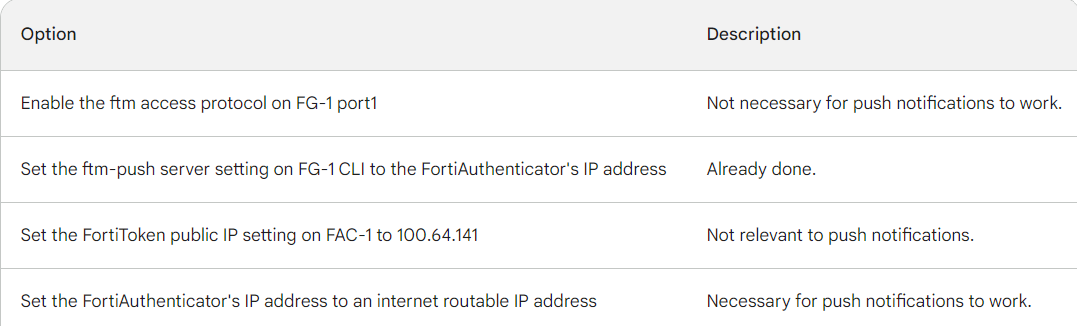
Refer to the exhibits.
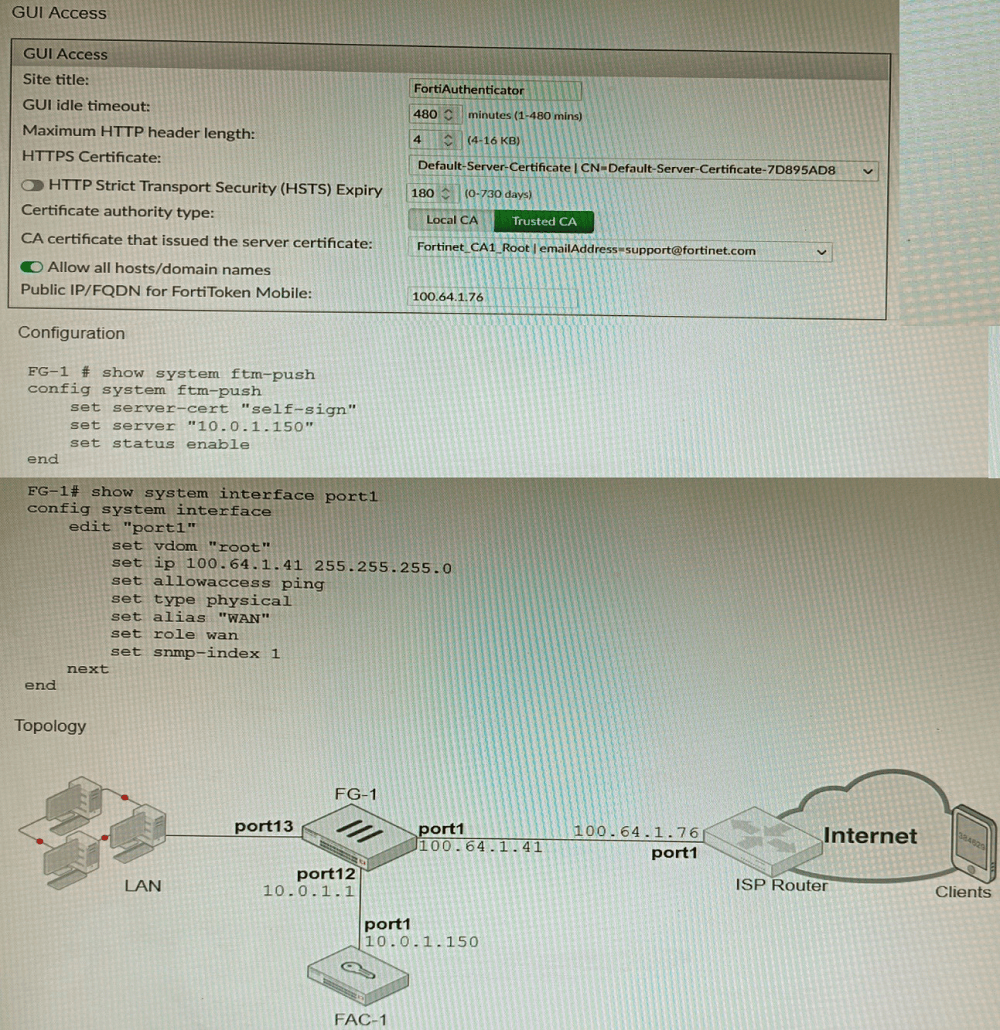
An administrator has configured a FortiGate and Forti Authenticator for two-factor
authentication with FortiToken push notifications for their SSL VPN login. Upon initial
review of the setup, the administrator has discovered that the customers can manually type
in their two-factor code and authenticate but push notifications do not work
Based on the information given in the exhibits, what must be done to fix this?
A. On FG-1 port1, the ftm access protocol must be enabled.
B. FAC-1 must have an internet routable IP address for push notifications.
C. On FG-1 CLI, the ftm-push server setting must point to 100.64.141.
D. On FAC-1, the FortiToken public IP setting must point to 100.64.1 41
Explanation:
FortiToken push notifications require that the FortiAuthenticator has an internet routable IP address. This is because the FortiAuthenticator uses this IP address to
send push notifications to the FortiGate.
The other options are not correct. Enabling the ftm access protocol on FG-1 port1 is not
necessary for push notifications to work. The ftm-push server setting on FG-1 CLI should
already point to the FortiAuthenticator's IP address. The FortiToken public IP setting on FAC-1 is not relevant to push notifications.
Here is a table that summarizes the different options:
Refer to the exhibit, which shows a VPN topology.
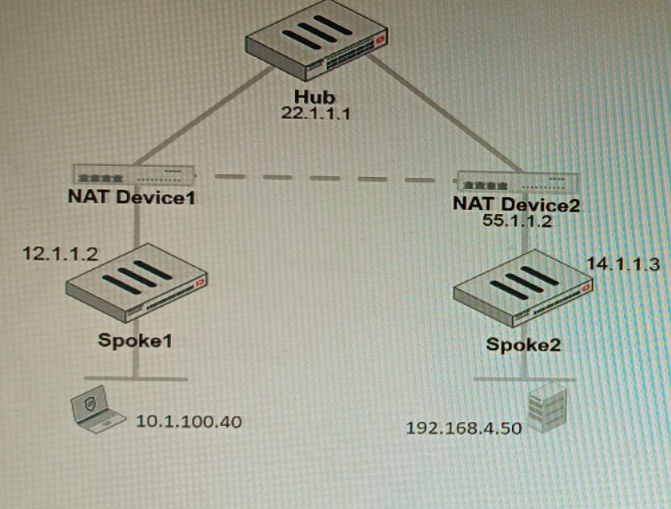
The device IP 10.1.100.40 downloads a file from the FTP server IP 192.168.4.50
Referring to the exhibit, what will be the traffic flow behavior if ADVPN is configured in this
environment?
A. All the session traffic will pass through the Hub
B. The TCP port 21 must be allowed on the NAT Device2
C. ADVPN is not supported when spokes are behind NAT
D. Spoke1 will establish an ADVPN shortcut to Spoke2
Explanation:
ADVPN uses NHRP and IKEv2 to dynamically create spoke-to-spoke tunnels when traffic flows between spokes. In this case, FTP traffic from Spoke1 to Spoke2 triggers a shortcut tunnel. This eliminates hub hairpinning, reduces latency, and ensures efficient bandwidth usage while maintaining security policies across the VPN topology.
✅ Correct Option:
D. Spoke1 will establish an ADVPN shortcut to Spoke2. With ADVPN enabled, inter-spoke traffic dynamically triggers shortcut tunnels. When the host at Spoke1 downloads from Spoke2’s FTP server, the hub signals NHRP to establish a direct IPsec tunnel between spokes, bypassing the hub and optimizing performance.
❌ Why Other Options Are Incorrect
A. All the session traffic will pass through the Hub.
This describes traditional hub-and-spoke IPsec VPNs. ADVPN specifically avoids hub hairpinning by allowing dynamic spoke-to-spoke tunnels. Once traffic between spokes is detected, the hub provides routing information and NHRP signaling, enabling direct communication. Therefore, traffic does not remain hub-bound.
B. The TCP port 21 must be allowed on the NAT Device2.
FTP traffic (TCP 21) is encapsulated inside the IPsec tunnel. NAT devices only need to allow IKE (UDP 500), NAT-T (UDP 4500), and ESP traffic. Application-layer ports are irrelevant to NAT traversal in IPsec tunnels. Allowing TCP 21 on NAT devices does not fix shortcut formation.
C. ADVPN is not supported when spokes are behind NAT.
ADVPN supports NATed spokes using IKEv2 with NAT-T encapsulation. NAT traversal ensures dynamic shortcuts can still be established. Fortinet documentation confirms ADVPN works with NAT environments as long as proper UDP ports are open. Thus, NAT does not prevent ADVPN operation.
📚 Reference
Fortinet Documentation – FortiGate ADVPN Guide:
“ADVPN dynamically establishes shortcuts between spokes using NHRP and IKEv2. NAT traversal is supported with UDP 4500, allowing spokes behind NAT to form direct tunnels.” Source: Fortinet Docs – ADVPN Configuration
| Page 2 out of 16 Pages |
| 12345678 |
| NSE8_812 Practice Test Home |
Choosing the right preparation material is critical for passing the Fortinet Network Security Expert 8 Written exam. Here’s how our NSE8_812 practice test is designed to bridge the gap between knowledge and a passing score.
Copyright © - All Rights Reserved